A foot valve that leaks, clogs, or admits air can leave a pump unprimed, restrict suction flow, or cause repeated failures that look like pump faults. You will learn how to identify the actual cause, inspect the suction line, and compare a valve by hydraulic performance, materials, dimensions, documents, and total ownership cost.
Key takeaways
- Install the valve below the lowest liquid level, above sediment, with clearance around the strainer.
- Check suction leaks, air ingress, and pump priming before blaming the foot valve.
- Compare valve size, pressure rating, flow loss, materials, and replacement access.
- Request drawings, test records, material details, and warranty terms with every Mumbai quote.
How the Foot Valve Retains Prime at the Pump Suction
Mount a ball-type foot valve vertically at the submerged end of the suction pipe, with its flow arrow pointing toward the pump. Keep the valve below the lowest operating liquid level and above bottom sediment; leave clearance around the integral strainer. Use these installation checks:
- Keep the strainer fully submerged during operation, including at the lowest tank or sump level.
- Support the suction pipe independently so its weight does not pull on the valve body or threaded joint.
- Seal threaded connections against air entry; suction leaks can destroy prime without showing visible water leakage.
- Match the valve’s free passage and strainer area to the pump’s maximum flow, not only to the pipe’s nominal diameter.
At start-up, suction pressure lifts the ball off its seat, letting water enter through the strainer and valve passage. At shutdown, backflow pushes the ball onto the seat, keeping the suction pipe flooded for the next cycle. A separate strainer filters but cannot seal; a foot valve does both.
It does not replace a discharge-side check valve. Debris on the seat can cause chatter and prime loss.
Symptoms That Separate Valve Faults from Pump and Suction Problems
Start with a controlled suction-line test: fill the line, isolate it, and watch the pressure or liquid level. Decay points to leakage through the foot valve, a suction joint, or the pipe; a pump that primes once does not prove the valve is tight.
- Foot valve fault: The pump loses prime after shutdown, yet the suction pipe and threaded joints remain sound. A leaking ball or seat, debris on the seat, or ball chatter causes pressure decay and intermittent priming. Remove the valve or test it separately.
- Suction-pipe leak: The pump draws air without necessarily showing a water leak. Brush soapy water over threaded joints while the line is under controlled vacuum, or monitor vacuum decay; bubbles or rapid decay identify the leak.
- Pump-seal fault: Water at the mechanical seal or shaft area indicates seal trouble. A damaged seal can admit air during suction, but replacing it will not cure a separate leaking suction joint.
- Low submergence: Vortices, visible bubbles, fluctuating flow, and noise appear when the liquid level falls. Raising the level or lowering the intake temporarily confirms the condition.
- Blocked line or strainer: Flow stays low while suction vacuum rises, and cavitation noise increases. Sludge, biological growth, or solids can restrict the strainer even when the valve still holds prime.
These foot valve problems in pumping systems reduce available NPSH; increasing pump speed can worsen the noise and damage. Loss of prime after every stop points to retention failure, while poor flow with stable prime points first to restriction, low submergence, or pump condition.
A Practical Inspection Sequence for a Failed or Noisy Valve
Start with the least invasive checks and do not replace the pump until the suction path holds a test. Isolate power before opening the valve or strainer.
1. Remove and clean the strainer. Look for sludge, algae, rust scale, plastic, and sand packed across the openings. Check the perforation size and free area; a clean-looking screen can still impose excessive suction loss if it is too fine for the liquid.
2. Check the ball through the valve access opening. It must move freely without binding, flattening, corrosion, or lodged debris. A sticking ball can cause noise during start-up and prevent the valve from opening fully.
3. Inspect the seat and sealing face. Remove grit, then look for scoring, cracks, pitting, or a hardened gasket. Pouring water into the suction line and watching it drain back can reveal a leaking ball-seat seal.
4. Examine every joint between the valve and pump. Tighten threaded connections, inspect flange gaskets, and look for split hose, cracked fittings, or corrosion. An air leak may admit air without producing a visible water leak.
5. Check the entire suction pipe for loose supports, pinholes, collapsed sections, and a pipe end lifted above the liquid. Test the isolated suction assembly with a vacuum gauge; a falling reading indicates leakage.
6. Refill the pump casing and suction line, vent trapped air, and confirm the pump retains prime while stopped. If it primes but cavitates, compare the clean-strainer and foot-valve pressure loss with the pump’s available suction head before changing equipment.
Buying Checks for Size, Flow Loss, Materials, and Service
Confirm more than nominal diameter before buying: suction-pipe size, pump manufacturer’s recommended velocity, maximum flow, static lift, liquid temperature, vapour pressure, and allowable suction loss must match the valve.
1. Specify the connection exactly: threaded end with thread standard, or flanged end with flange drilling; also state pressure class, flow direction, permitted installation orientation, and the pump’s suction-pipe arrangement.
2. Check the strainer opening against the solids load. Small perforations retain debris but clog quickly and increase suction loss; large perforations reduce restriction but let damaging solids reach the ball and seat. Raw water, sewage, and slurry need a solids review, not a diameter-only choice.
3. Name every wetted material: cast-iron body, ball material, seat, gasket, fasteners, strainer, and coating. Clean water is the easiest service; saline or chemically treated water can corrode cast iron, cause tuberculation, and create rust scale that prevents sealing. Verify chemical compatibility for aggressive liquids and hydrocarbons, including gasket compatibility.
4. For hot water, confirm the maximum continuous and peak temperature, pressure rating at that temperature, and liquid vapour pressure. Incorrect limits can cause leakage, vapour formation, or a damaged seat.
5. Ask a cast iron ball foot valve dealer whether the ball and seat are replaceable, whether spare internals are stocked, and whether the quoted model includes a dimensional drawing, installation instructions, and pressure-test procedure.
6. Put inspection requirements in the order: marked size and rating, material certificate where required, pressure-test record, strainer specification, warranty, and traceable invoice. A “CI foot valve” description alone is incomplete.
Comparing Mumbai Quotes, Documents, and Lifetime Cost
Do not compare a number labelled “Texas CI foot valve price” until every quote describes the same valve. A Mumbai location, marketplace listing, or claim of being a Texas cast iron foot valve in Mumbai does not prove authenticity, suitability, or authorised supply.
Ask each Texas foot valve supplier in Mumbai to state these items on the quotation:
- Nominal size, screwed or flanged connection, thread standard or flange drilling, pressure class, and delivery status: physically in stock or ordered after payment.
- Body, ball, seat, gasket, and strainer materials; coating; perforation; temperature range; flow direction; and permitted installation orientation.
- Actual port and seat-bore area, plus clean-strainer pressure-drop data. A larger outside body can still restrict suction through a narrow passage.
- Manufacturer model or part number, dimensional drawing, pressure-test record, material certificate where required, warranty terms, and a traceable tax invoice.
- Total delivered cost to your Mumbai site, including GST, freight, inspection documents, and expected dispatch date.
- Replaceable ball and seat availability, spare-part prices, and the manufacturer’s cleaning and test procedure.
Navkar Enterprises -Texas Valves (India) belongs in a fair comparison only when its offer supplies the same evidence and cost basis as competing quotes. Reject a cheaper substitute if it changes the connection, rating, internals, or delivery status; a valve that cannot be repaired after seat damage costs more in downtime and replacement labour.
Related product
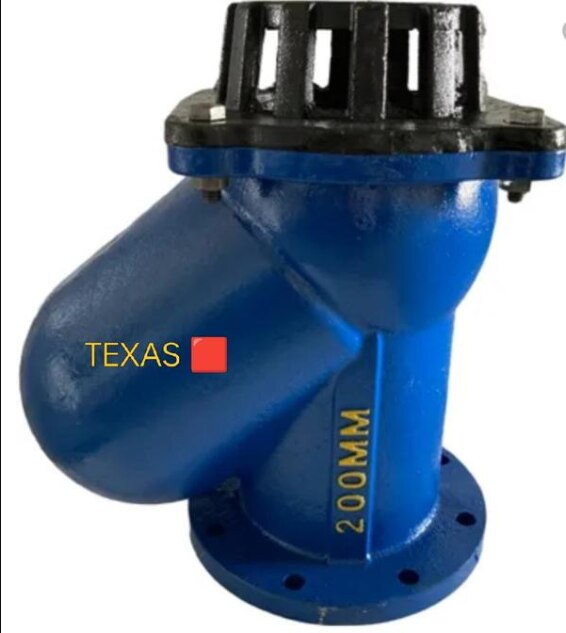
 | BALL TYPE FOOT VALVE TEXAS 🟥 CI FOOT VALVE BALL TYPE CI BALL TYPE FOOT VALVE SCREWED & FLANGED END TEXAS 🟥 View product → |
Frequently asked questions
How does a Texas cast iron foot valve retain pump prime?
A ball-type foot valve closes when the pump stops, holding liquid in the suction pipe. Install it vertically, below the lowest operating liquid level, with the flow arrow toward the pump.
How can you distinguish a faulty foot valve from a suction problem?
A leaking valve causes loss of prime after shutdown. Air leaks at joints, a blocked strainer, inadequate submergence, or a suction pipe leak can produce similar symptoms, so inspect the complete suction line.
What should you inspect when a foot valve fails or becomes noisy?
Isolate and remove the valve, then check the ball, seat, hinge or guide, strainer, debris, corrosion, pipe alignment, and signs of cavitation or water hammer.
What buying checks matter for a cast iron ball foot valve?
Match nominal size, connection standard, pressure rating, flow direction, body and trim materials, strainer area, expected flow, and allowable head loss to the pumping system.
How should you compare Mumbai foot valve quotes?
Compare the complete delivered specification, including make, size, material, documents, testing, warranty, dispatch time, taxes, freight, and the energy and maintenance cost of flow loss.
Keywords